That favorite denim jacket has a hole near the pocket. The cuff on your only good pair of chinos is unraveling. Most people toss these items into the donation bin or the trash without a second thought. But throwing away clothes because of minor damage is expensive and wasteful. You don’t need to be a professional tailor to fix most common clothing issues. Learning basic mending skills keeps your wardrobe rotating longer, saves money, and reduces textile waste.
In New York City, where space is tight and fast fashion moves quickly, it’s easy to fall into the trap of buying new instead of repairing old. However, mastering a few simple repairs can transform how you view your closet. This guide covers the essential techniques for fixing holes, loose threads, and broken zippers right at home.
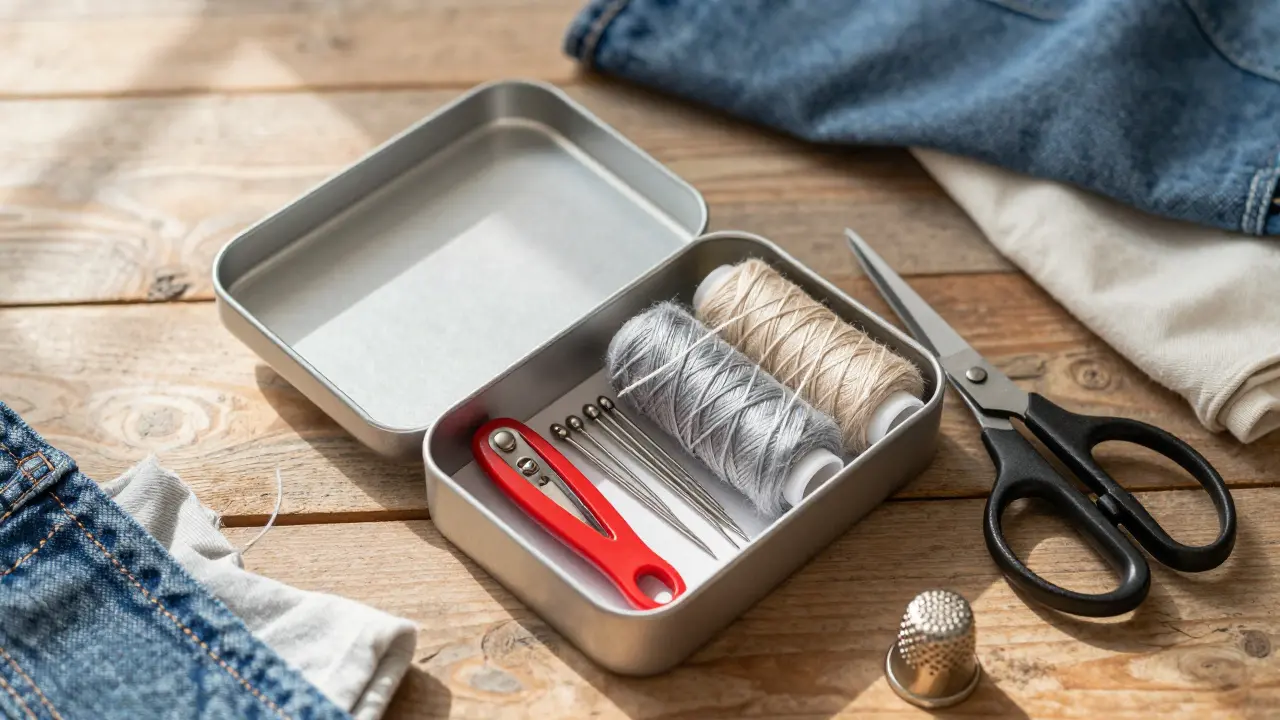
Essential Tools for Every Mender
You don’t need an industrial sewing machine or a rack of expensive supplies to start mending. A small kit with five key items will handle 90% of household clothing repairs. Keeping these tools in a drawer makes it easier to tackle problems before they become unfixable.
- Sharp Seam Ripper: This small tool looks like a red plastic stick with a metal tip. It removes old stitches cleanly without damaging the fabric. It’s crucial for taking apart hems or removing tags that cause itching.
- Assorted Needles: Keep a mix of sizes. Use larger needles (size 9-12) for denim and canvas, and finer needles (size 7-8) for silk or cotton blends. Darning needles with large eyes are perfect for thicker threads.
- Mending Thread: Unlike regular sewing thread, mending thread is stronger and often comes in neutral colors like beige, gray, and black. Brands like Gutermann offer durable options that withstand washing.
- Fabric Scissors: Never use kitchen scissors on fabric. They dull quickly and create jagged edges. Invest in a dedicated pair of sharp fabric shears.
- Pins and Thimble: Straight pins hold fabric in place while you sew. A thimble protects your finger when pushing through thick materials like leather or heavy denim.
Storing these tools together creates a habit. When you see a loose thread, you grab the kit immediately rather than waiting until the problem worsens.
Fixing Holes: The Invisible Patch Method
Holes happen. Whether from friction, snagging on jewelry, or simply wearing out over time, holes are inevitable. The goal isn’t always to make the repair invisible, but to make it strong and aesthetically pleasing. For small holes less than one inch wide, the invisible patch method works best.
- Cut a Patch: Find a scrap of fabric that matches the weight and texture of the garment. If you don’t have matching fabric, use a similar color from an old shirt. Cut a square slightly larger than the hole.
- Position the Patch: Turn the garment inside out. Place the patch behind the hole. Pin it in place so it extends at least half an inch beyond the damaged area.
- Sew Around the Edges: Using a needle and thread, stitch around the perimeter of the patch. Use a running stitch (in-and-out) for speed or a backstitch for extra strength.
- Secure the Corners: Add extra stitches at each corner of the patch to prevent peeling. Trim any loose threads.
This method reinforces the weak spot without adding bulk. For visible areas, consider using embroidery floss to turn the patch into a decorative element. This approach aligns with the Japanese art of Sashiko, which is a traditional form of reinforcement stitching that uses geometric patterns to strengthen fabric. By embracing the repair, you extend the life of the garment while adding unique character.
Stopping Runs and Ladders in Knits
Knit sweaters and t-shirts are prone to runs, especially if caught on a zipper or ring. A small run can quickly become a massive tear if ignored. Acting fast stops the damage from spreading further down the fabric.
To fix a ladder in a knit sweater:
- Locate the End: Find where the run starts and ends. Use a safety pin to block the bottom end so it doesn’t grow longer while you work.
- Weave Back Up: Thread a needle with yarn that matches the sweater color. Insert the needle under the first horizontal strand at the top of the run. Pull it up gently.
- Create New Strands: Move the needle across to the other side of the ladder, weaving it under the next available horizontal strand. Repeat this process down the length of the run.
- Secure the Yarn: Once you reach the bottom, knot the yarn securely against an existing stitch. Hide the tail by weaving it into the fabric.
If the yarn is too thin to weave easily, dip the needle in water to make it stiffer. This technique restores the structure of the knit without needing complex darning skills.

Reinforcing Fraying Hems
Hems fray because the edge of the fabric is exposed to friction and washing. Over time, threads pull away, creating a ragged look. Reinforcing a hem prevents further fraying and gives the garment a polished appearance.
The simplest method is the blind hem stitch. This stitch hides most of the thread on the outside of the garment, making it nearly invisible. Here’s how to do it:
- Prepare the Hem: Fold the raw edge of the fabric up by about half an inch. Then fold it again to cover the raw edge completely. Press with an iron to set the crease.
- Start Stitching: Insert the needle from the wrong side of the fabric, catching just one thread of the main garment. Pull the thread through.
- Move Along the Fold:** Pick up a small amount of thread from the folded hem edge. Move the needle forward about half an inch along the main garment, catching one thread again.
- Repeat: Continue this pattern around the entire hem. The tension should be loose enough to allow the hem to lie flat but tight enough to hold it in place.
For heavy fabrics like jeans, a double-fold hem provides more durability. If the original hem is completely gone, you can re-create it using this method. It’s faster and cheaper than taking the pants to a tailor.
Repairing Broken Zippers
A broken zipper ruins a jacket, bag, or skirt instantly. Before tossing the item, check if the zipper itself is salvageable. Often, the issue is a misaligned slider or a missing tooth, not a complete failure.
| Problem | Diagnosis | Solution |
|---|---|---|
| Slider Stuck | Fabric caught in teeth | Gently pull fabric free; lubricate with soap or graphite pencil lead |
| Teeth Separating | Slider worn out or loose | Tighten slider with pliers; replace slider if cracked |
| Missing Tooth | Physical damage to track | Replace entire zipper; cannot repair single tooth effectively |
| Zipper Won't Close | Bottom stop broken | Add new stop using pliers and wire; or sew a temporary button closure |
If the slider is loose, use needle-nose pliers to gently squeeze the sides of the slider. This tightens the grip on the teeth. Be careful not to crush it too much, or it won’t move at all. Test the zipper after each adjustment. If the teeth are bent, straighten them with pliers before attempting to close the zipper.

When to Mend vs. When to Replace
Not every piece of clothing deserves a repair effort. Knowing when to let go is part of effective wardrobe management. Consider the cost of materials and time versus the value of the garment.
If a shirt costs $5 and has multiple holes, replacing it might be more practical. However, if a coat costs $200 and has a torn lining, repairing it saves significant money and preserves the item’s fit and style. Emotional attachment also plays a role. Heirloom pieces or items with sentimental value often warrant extensive repair efforts.
Ask yourself three questions before starting a project:
- Is the structural integrity compromised? (If yes, repair is critical.)
- Do I have the right tools and materials? (If no, learn or buy them.)
- Will I wear this item regularly after repair? (If no, consider donating.)
This decision framework helps prioritize repairs that matter most. It prevents hoarding damaged items that never get fixed.
Maintaining Your Wardrobe Long-Term
Regular maintenance prevents major repairs. Simple habits extend the life of your clothes significantly. Wash garments inside out to protect outer surfaces. Use cold water to reduce shrinkage and fading. Air dry when possible to preserve elasticity and shape.
Store clothes properly. Hang heavy items like coats on sturdy hangers. Fold knits to prevent stretching. Keep drawers organized to avoid crushing delicate fabrics. Inspect your wardrobe monthly for loose threads or small stains. Addressing issues early prevents them from becoming disasters later.
Learning to mend is an investment in sustainability. It reduces the demand for fast fashion and lowers your carbon footprint. Plus, there’s satisfaction in wearing something you’ve repaired yourself. Each stitch tells a story of care and attention.
What is the easiest mending technique for beginners?
The easiest technique is darning small holes with a running stitch. It requires minimal skill and works on almost any fabric. Start with a simple patch behind the hole and sew around the edges.
Can I fix a run in a sweater without matching yarn?
Yes, you can use a contrasting color to create a visible repair. This turns the flaw into a design feature. Alternatively, cut a small piece of yarn from an inconspicuous area like the hem or tag seam.
How do I prevent clothes from pilling?
Wash clothes inside out and use a gentle cycle. Avoid drying high-friction items together. Use a fabric shaver to remove existing pills safely without damaging the material.
Is it worth learning to sew buttons?
Absolutely. Sewing buttons is one of the fastest and most useful skills. It takes less than two minutes per button and prevents shirts from gaping open. Use strong thread and wrap it around the shank several times for security.
What should I do if a zipper breaks completely?
If the zipper teeth are damaged or the slider is broken, replacement is usually necessary. You can buy zippers online or at craft stores. Removing the old zipper requires a seam ripper, and installing the new one needs precise stitching.